This is an old revision of the document!
Table of Contents
Using SSH for connections/transfer to/from SDF[-EU]
Contents
Overview
This tutorial discusses some important points concerning use of SSH for encrypted traffic to and from SDF[-EU]. Your first source for information are the manpages: “man ssh” - read them, if you want to make good use of “ssh” and company!
Note: this text has been assembled from articles written by several users; therefore, layout and wording may vary, and topics can be referred at several places.
SSH stands for Secure SHell, and is a replacement for telnet, to permit secure terminal connections. The system mainly consists of the following programs:
- ssh This is the main program, used for direct terminal connections to a remote computer. In principle it is used like “ssh remoteuser@some.remote.host”.
- scp This is a replacement for ftp or rcp, and permits secure copying of files to and from a remote computer. Its basic syntax is “scp localfile remoteuser@some.remote.host:remotefile” to copy a file to the remote computer, and “scp remoteuser@some.remote.host:remotefile localfile” to copy a file from the remote computer. Note that you can also use wildcards in the remote and local file description (which may need quotes around the remote file name, depending on your shell).
- sftp This is a replacement for ftp, permitting listing of a remote file system and copying to and from it. It has more capabilities than scp, but needs a remote service running under ssh. In principle it is used like “sftp remoteuser@some.remote.host”.
On the client side, a lot of programs are available; you may be best off by using a search engine with the keywords “ssh client” and your local operating system.
SDF[-EU] issues
Here we discuss some peculiarities concerning SDF-[EU] and SSH.
file and directory permissions
SSH Public key authentication will not work, if the home directory (“$HOME”) or the user's ssh directory “$HOME/.ssh” are world writable. Your home directory should never be world writable, anyway!
To make sure you have the right permissions, execute the following command in the shell while logged into your account:
“chmod go-w $HOME $HOME/.ssh”
You should look up “chmod” in the manpages, if you don't understand this command.
SSH Public Key Authentication
These instructions attempt to explain the basic concepts of SSH Public Key Authentication, what it is, and the steps required to use it.
Note: Please make sure to have set the correct permissions in your SDF account, before attempting to set up public key authentication! Also note that there is another way of doing this, explained further down by another user. Your mileage may vary!
Logging in with SSH key authentication means that you do not have to use your SDF account password. Instead, you generate a 'key' – which is two long strings of characters stored in a pair of files – and these files are used to verify that you are who you say you are. Since your key can reliably identify you, you can authorize the user of this key (you, hopefully) to log in to your SDF account. You can authorize any key you wish, and adding someone's key would allow them to log in to your SDF account, without even using or knowing your password.
This may sound insecure or easily exploitable. In fact though, due to much research and theory, it can be very secure. Notice “can be” in that last sentence. The key files are taking the place of a password in proving to the server that you're really you. Just like you have to keep passwords secret, the strength of this method relies on you following certain guidelines. You will generate a pair of mathematically related keys: one public and the other private. 

Windows instructions
You will need an SSH client and a key generator for Windows. These instructions are written for the popular programs PuTTY and PuTTYgen. Both are available at www.chiark.greenend.org.uk/~sgtatham/putty/download.html.
Run PuTTYgen. At the bottom of the window, you can select which type of key you want to generate. You will need to pick between RSA and DSA encryption: go with RSA – the relevant website is here: http://the.earth.li/~sgtatham/putty/0.53b/htmldoc/Chapter8.html#8.2.2 . Your choice will have no effect on the rest of the steps here. For current applications, 1024 bits is plenty for a key to have. If youre feeling paranoid, 2048 bits should (barring any revolutions in prime factoring) keep your key secure for a decade or two.
Now press Generate and wave your mouse around to seed some randomness in the key generator. Viola, you have a key.
You can then add a passphrase to your key, and use just that one passphrase whenever you log in to an ssh server using your key. Alternately you can use no passphrase. Be aware though that if you don't have to use a password to login from your computer, then neither would anyone else that sits down at your computer or otherwise accesses your local account.
The key comment is for your personal convenience, I recommend youruser@yourlocalmachine and maybe the date, but of course it's up to you. Now save both the private and public key file somewhere (My Documents is a good choice, but pick somewhere that only *you* will have read access to.)
Next, you need to configure PuTTY to use this key. Fire up PuTTY and load your session or create a new one. Then in the Category list on the left, select “Connection” → “SSH” → “Auth”. Browse for your key and load it up. Also, you'll want to allow changes of username if your SDF account name is different from your local one.
You're almost done! Now you need to let the server know about your new key. After you do this, the ssh, scp and sftp programs will use the key files automatically. So (optionally, but it is recommended) save your session, and then connect. Now do the following to authorize your key:
0. Copy the contents in the Key Generator window (“Public key for pasting into OpenSSH authorized_keys file”) Note that we can also extract from existing PuTTYgen-type private keys: just load into it, and the public key should be there.
1. Log in as normal and run the following commands.
2. “$ mkdir ~/.ssh”
3. “$ cd ~/.ssh/”
4. “$ touch authorized_keys”
5. Open the authorized_keys file you just created in a text editor.
6. Paste the contents of that box in to the authorized_keys file. In PuTTY, right click copies and pastes.
7. Save the authorized_keys file.
You should now be able to log in using SSH Key Authentication.
OpenSSH instructions
You can get OpenSSH at www.openssh.com or through package installers like rpm or apt-get. There are versions for most major non-Windows operating systems (and even one for Cygwin.) Once you have the OpenSSH suite set up, the program you will need to run is “ssh-keygen -t”. The -t option is required, and specifies the type of encryption algorithm used in generating a key. You should use RSA encryption to generate your key – the relevant website is here: http://the.earth.li/~sgtatham/putty/0.53b/htmldoc/Chapter8.html#8.2.2 .
you@yourcomputer:~ $ ssh-keygen -t rsa
You can then add a passphrase to your key, and use this passphrase whenever you log in to an SSH-enabled server. Alternately you can use no passphrase. Be aware though that if you don't have to use a password to login from your user account, then neither would anyone else that sits down at your computer or otherwise accesses your local account.
You now have two new files in the ~/.ssh/ directory. These files are your public and private key and will be named id_rsa.pub and id_rsa respectively. The ssh, scp and sftp programs use these files automatically. To enable the server to recognize your key, follow these steps:
1. Log in as normal and run the following commands.
2. “$ mkdir ~/.ssh”
3. “$ cd ~/.ssh/”
4. “$ touch authorized_keys”
5. Open the authorized_keys file you just created in a text editor.
6. Paste the contents of your id_dsa.pub file in to the authorized_keys file.
7. Save the authorized_keys file.
You should now be able to log in using SSH Key Authentication.
How to enable Port Tunneling and Why
What is port tunneling good for
Port tunneling is the ability to tunnel from your internet point for presence back to SDF[-EU] servers and use the SDF[-EU] servers like a Socks 4 Proxy. This allows your connection to be encrypted via SSL between your internet access point and SDF[-EU]. This allows your traffic to be more secure if you are on a public internet access point
What tools are needed
Commandline ssh client
Those using MacOSX, Linux, SunOS or some BSD or other will be used to using the commandline ssh client to connect to SDF.
Issue a command from your workstation similar to this one (MetaARPA membership required):
ssh -D 1080 -p 465 username@odin.sdf-eu.org
Alternatively, you can use an external program known as 'connect'. All the details for using this program are documented on its webpage at https://bitbucket.org/gotoh/connect/
How to set up PuTTY
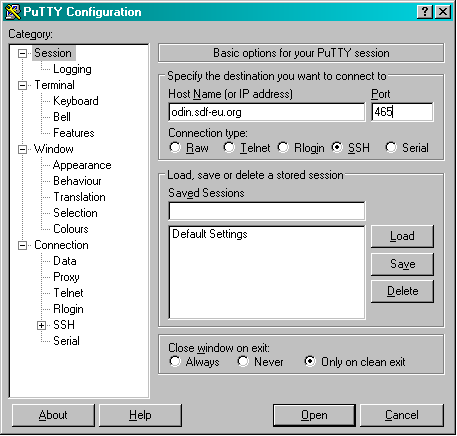
First you need to connect to a SSL enabled SDF[-EU] server: odin.sdf-eu.org on port 465.
Then you need to configure the port to tunnel on your local machine. Generally Socks proxies use port 1080 so that is a good port. Click on the Tunnels category and configure the tunnel as shown below.
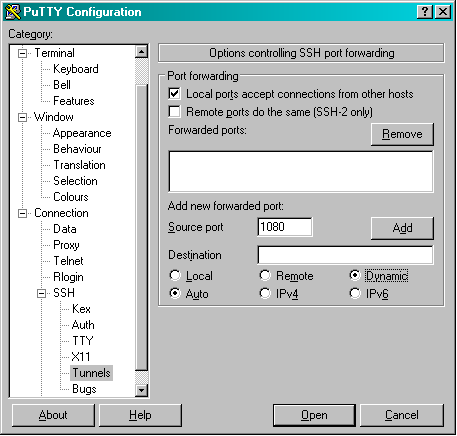
Click on the “Add” button and you should see the screen as listed below.
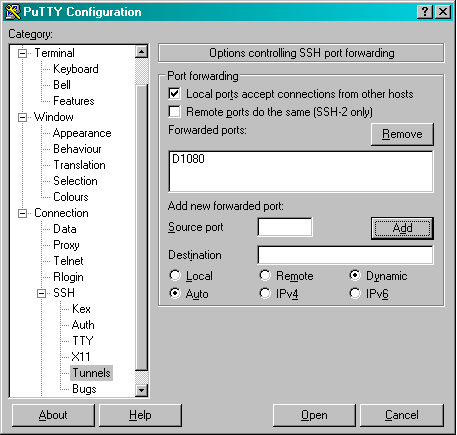
Then go back to session and name and save the session. Click connect and the tunnel should become active.
Finally, configure your browser to use the SOCKS proxy on “localhost” using port 9999 as shown below using Firefox.
How to use the Tunnel you just enabled
I am now going to configure Firefox to use the Tunnel. It should be obvious how to configure other applications from these screenshots.
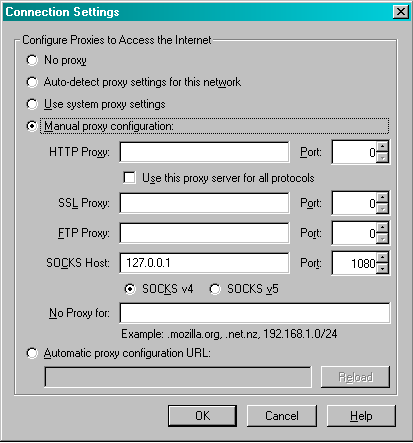
First click on the “Tools” and select “Options”. Select “Advanced”, “Network” and “Settings” to get to the proxy configuration. Activate “Manual proxy configuration” with these settings:
- Socks Host: 127.0.0.1 (or “localhost”)
- Port: 1080
- Check the “Socks v4” box
Click on “OK”. Now your service should be able to connect through the tunnel. Again this will encrypt all traffic from your Internet Access Point to SDF-EU. Once it leaves SDF-EU it will no longer be encrypted (Unless you are hitting a HTTPS page or something already encrypted). Technically any program that supports a Socks 4 proxy can be used with the tunnel.
To verify, we direct our Firefox to a page that tells us our IP; if everything worked fine, the IP listed should be the one of SDF-EU.
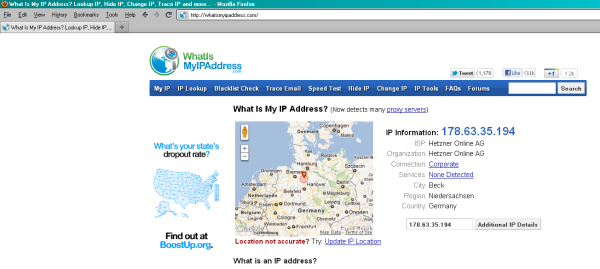
For additional security and privacy, configure Firefox to do remote DNS lookups rather than the default local DNS lookups. In about:config search for network.proxy.socks_remote_dns and toggle its value to true.
Configuring SSH clients to use a SOCKS proxy server
…or connecting to SDF from a network
Assuming that you are having trouble connecting to SDF from your college network you will probably have to configure a connection through a SOCKS proxy. This tutorial gives help on configuring various clients to use a SOCKS proxy.
You will need to know the following information from your system administrator…
- Proxy hostname i.e. “socks-proxy.example.com”
- SOCKS version (4 or 5)
- Port number to connect to (default is 1080)
- Your username and password
SSH(C) – SSH Communications Security Corp
This client is often supplied by universities to their students.
- Access the settings dialogue under “Edit → Settings”
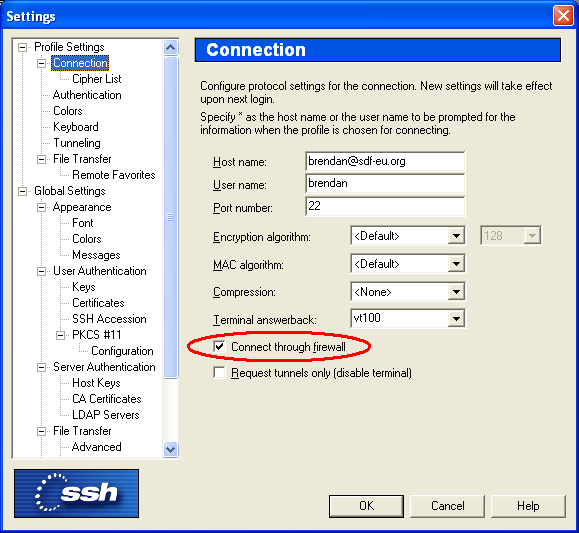
- Under the “Connection” section, make sure that the tickbox marked “Connect through firewall” is checked
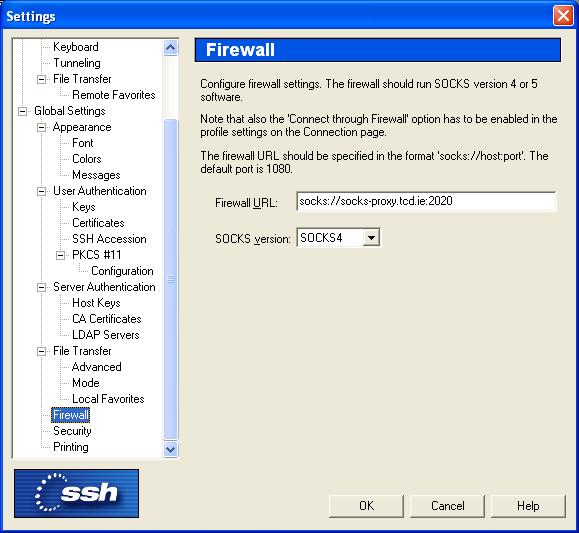
- Under the “Firewall” section (near the bottom of the list) enter your SOCKS proxy settings in the form of “socks://HOST:PORT” Illustrated are the settings for TCD.
- Connect as normal!
PuTTY
A popular free SSH client.
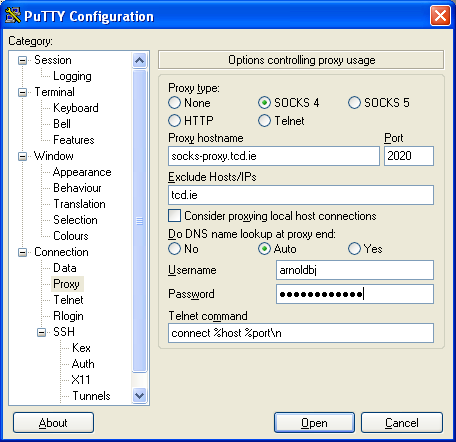
- Select in the left window “Proxy” (located under the “Connection” branch)
- Enter in your details. Illustrated are those for TCD.
- Connect as normal! (You may want to save these details for future use)

